Manipulating Pictures in Windows Media Player
Unless you are a
perfect shot every time you click the shutter, there will inevitably be
times where the photos you take with your digital camera can use some
touching up—anything from removing red eye to cropping out unnecessary
portions of the photograph. Despite the fact that versions of Windows
prior to Vista did not include this functionality for you (requiring you
to purchase third-party software), Windows Media Player contains some
tools that allow you to do basic image correction.
To fix a photo using the
Touch Up tool, navigate to the photo inside Windows Media Player.
Right-click on the image and select the Picture Details option. Now,
click the Touch Up option and this will give you the following options
to the left of the picture (see Figure 6):
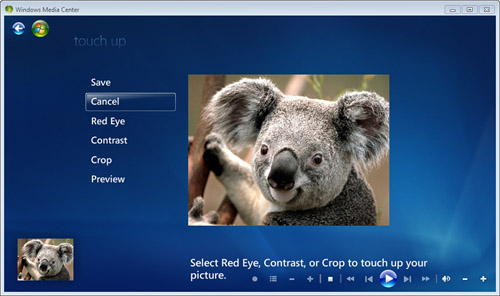
Red Eye— Enables you to select an area of the picture for the wizard to remove “red eye” (caused by the flash bouncing off the retina)
Contrast— Gives you a submenu allowing you to change the brightness and contrast of the picture
Crop— Gives you a highlighted frame within the picture, allowing you to “cut out” unnecessary picture elements
Preview— Allows you to take a closer look at the changes you’ve made before committing to them
Each of these tools
automatically adjusts the aspects of the image for you. If you don’t
like what Touch Up does, you can cancel the changes by clicking the
Cancel button. If you want to save your changes, you will have no choice
but to overwrite your existing image.
|
It’s
somewhat difficult to reconcile the fact that Microsoft removed a lot
of features from Windows 7 that were just added in Windows Vista, but
that’s somewhat how Microsoft works. This isn’t the first time they
figured out another way to handle something and just made the changes.
The good news is that you can find the old Photo Gallery refreshed and
reinvigorated in the new Windows Live software package, a free download
for any Windows user. Windows Live offers you free web calling, email,
instant messaging, an expanded word processor that also neatly works
with common (and non-Microsoft) blogging tools, the new Movie Maker, and
the Photo Gallery application, all tightly integrated with your online
Windows Live account.
Don’t worry if you only
have a Hotmail address or an old, and mostly dead, Passport. It will
get you into Windows Live. Just keep in mind that there are other
choices available. Google and Yahoo! Both offer a wide range of free and
low cost tools which perform the same functions. Just because you’re
using Windows doesn’t mean you are required to use Microsoft software.
|
Printing Your Masterpiece
Windows 7’s Slideshow
feature can show you your digital photos immediately. How about instant
prints from your digital photos? By printing the photos on your own
color printer, you can have pictures as fast as your printer can produce
them and get them in a variety of sizes.
Tip
If
you haven’t used your inkjet printer for a week or more, or your
printouts are of poor quality, click the Utilities tab (if available)
and run your printer’s head cleaning or nozzle test options with plain
paper inserted in your printer (take out the photo paper until you’re
ready to print a good print). Head and nozzle clogs will ruin your
printout and waste expensive photo paper, and most recent printers also
offer a cleaning routine on this tab. If your printer doesn’t have a
menu option for head cleaning, check the instruction manual for the
correct method to use. You might need to press buttons on the printer to
activate a built-in head-cleaning routine. |
You can print photos from
either the toolbar in a photo folder or the pull-down menu in a photo
folder. To make prints from the digital pictures stored on your
computer, simply select the photos you want to print (use Ctrl+click or
Shift+click to select individual photos from the folder, or you can use
Ctrl+A to select all of them) and click the Print button. This brings up
the Print Pictures dialog box, shown in Figure 7.
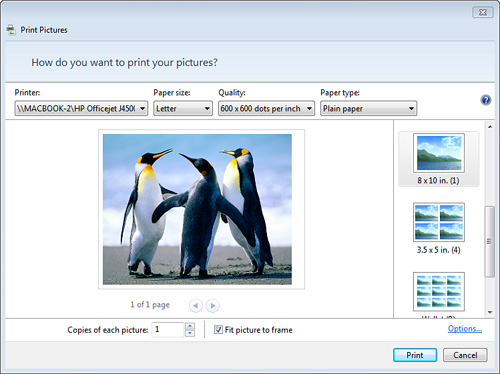
From here, you can
modify the options that control how and where the picture is printed.
Above the picture you are printing, you can change the printer used, the
paper size in the printer, and the print quality used. At the bottom,
you can choose how many pictures are to be printed, as well as the
option Fit Picture to Frame. If selected, this means that Windows will
resize the picture so that it fills up the entire picture size selected
on the right side of the window at the expense of cropping out some of
the top and/or sides of the photograph. When deselected, it will print
the original photograph in its entirety but will leave whitespace at the
top and/or sides of the frame, where the photograph does not exactly
fit the photograph size selected.
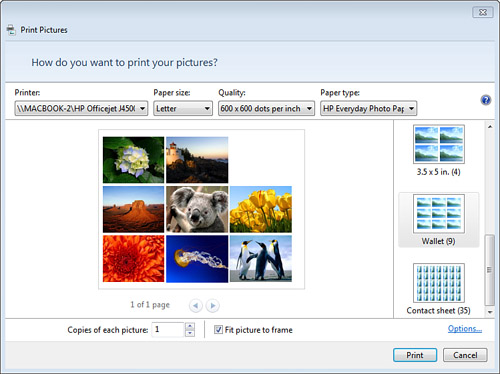
Along the right side of
the Print Pictures window, you will see several options for how the
printed photographs will fit on the paper selected. As you choose
different finished photograph sizes on the right, the picture preview in
the middle of the window will change to reflect how the photos should
actually appear on the paper when printed, as reflected in Figure 8.
If you choose fewer photographs than are available for the layout
chosen, Windows will leave blank space on the photo sheet to conserve
ink in your printer.
Tip
For
best picture quality, it is generally recommended to leave the Fit
Picture to Frame option selected. If you want exact control over what is
displayed in the picture, use the Edit picture option in Windows
Pictures Library. |
If
you find that your digital photos look terrific onscreen but are poor
quality when printed, there are three major factors that control digital
photo quality—any of which could be the culprit: Camera settings Printer settings Paper type
Get any of these wrong, and you won’t get the print quality you want. Your
digital camera should be set to its highest quality and resolution
settings, especially if it’s a 2-megapixel or lower-resolution camera.
Highest quality uses less compression to avoid loss of fine detail (more
space is used on the flash memory card per picture than with lower
quality settings), and highest resolution uses all the pixels to make
the picture (again, requiring more space on the flash memory card per
picture). If you use your camera to create pictures for use on the Web,
the lower quality and resolution settings are fine, but printed pictures
need the best quality available. Remember that your monitor needs just
96 dots to make an inch, whereas most inkjet printers put 600 to 1,200
dots into the same inch. So, a picture that’s just right to fit on the
screen doesn’t have enough detail to print well. Similarly,
the printer should be set for the best quality setting that matches the
paper type. If you’re planning to print “knock-’em-dead” digital
masterpieces, be sure to use photo-quality paper and set the printer’s
options accordingly. Just want a quick snapshot for the refrigerator?
Use plain paper and set the printer for plain paper. Mismatch print type
and paper type and you’re sure to have problems because inkjet printers
calculate how much ink to use and how to put it on the paper according
to the options you select. Remember,
high-quality printing takes time; several minutes for an 8×10-inch
enlargement on photo paper with high quality settings is typical. If
your digital camera is only capable of 2 to 5 megapixels, it’s time to
upgrade; 7 to 10 megapixel (also called 7–10MP) cameras are as cheap as
ever and the storage needed to support those large images is also dirt
cheap. You can generally find 8 to 16GB SD, xD, miniSD, or microSD
(these sizes also add the term HC, or High Capacity, to the name) cards
for as little as $30–$50. It’s all the more mind boggling when you
realize that an 8GB microSD card, about half the size of a key on a
laptop, can be had for as low as $20. So, before you start collecting
more low-grade images of your family, take a gander at the $100–$150
offerings in the camera section at your local big box store. Make sure
to pick up some storage cards at the same time. |
|
Sharing Your Photos with Others Electronically
Windows
Windows Pictures Library supports two methods of sharing your
photographs with others without having to print them out—emailing and
burning them to CD/DVD. This section touches on the first of these
methods.
Tip
Windows
Mail is no longer included in Windows 7. It is a part of the Windows
Live software set, which you can download from Microsoft for free. It’s
now integrated into Windows Live, but it still supports a wide range of
email account types and advanced email management functions, including
improved handling of email messages that include images.
|
Emailing
photographs is straightforward; you select the pictures you want to
email and choose E-mail from the toolbar at the top of the window. You
are then given the option of resizing the files to a lower resolution to
make them smaller and therefore easier to send to someone as an email
attachment. The Attach Files dialog box defaults to 1024×768, which is a
good standard size—however, you can size them to any resolution from
640×480 to 1280×1024, or choose to leave them at the same resolution as
the source. Whichever resolution you choose, the Attach Files dialog box
will give you the size in megabytes of the attachments.
After
you have decided on a picture resolution, click the Attach button.
Windows Pictures Library will then resize each of the pictures and open a
new email message in the default email program (which, by default, is
Windows Mail) with each of the photos as a separate attachment to the
email. All that’s left to do is address the email, edit the subject and
text, and click Send.